 |
Kawasaki ZX-14 / 14r, zzr1400, 06-07 Gen 1 (08-24 Gen
2)
|
|
|
Kawasaki ZX-14 / 14r, zzr1400, 06-07 Gen 1 (08-24 Gen
2)
|
 |
ECU reflash |
 |
EVO Shift STAR kit "Stronger than stock!" |
 |
Hybrid Ceramic Wheel Bearings | Velocity Stacks |
|
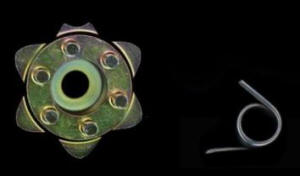
EVO Shift Star kit SHFT-EVO-K96/zx14r $299.95 USD
K96 EVO Shift
Star, Ceramic
Microbearng Detent Arm, F-Pro Shift
spring, 0198/0810 clutch cover gasket (415) 883-5620
|
Factory Pro's famous EVO SHIFT STAR kit Stronger than stock shift star pins. 20% quicker shifting. Make shifting MUCH quicker and virtually eliminate missed shifts. The Shift STAR kit makes shifting even quicker and even easier.Includes Factory Pro's exclusive Shift STAR, HD detent spring and clutch cover gasket.
You must remove (and
replace) the clutch assembly to install. Needs
1/2" impact wrench and 30mm socket. 1-2 hour
install. Perfect to install when upgrading your clutch.
Feedback: Hey Marc, I got it done and test rode....here's my initial impression..My 2013 14r used to have a clunky lazy shifter feel even after swapping to Vortex rearsets. After going on a test romp right after the install of the Shift Star kit I noticed right away was how smooth it was engaging gears and how the shift was much quicker gear to gear. I also run a quickshifter on my bike and maaaaaan as soon as I was able to blast off down the highway it ripped thru the gears effortlessly. My main issue to swapping to the shift star was because I was missing gears way too often and constantly had to watch my rpms to make sure that I was shifting lower than the rev limiter so that I wouldn't miss....no more. I was able to rip thru the gears without worry.
My only
regret is that I didn't upgrade
this from the first missed
shift. Thanks for the
great product and
awesome customer service and
staying in communication with
me. This is a product I'm
definitely going to recommend to
friends and fellow riders in
Houston!
Teddy Houston, Texas July 3, 2019 July 4, 2019 Tech Notes: The reason zx14's
break the shift star pins is that
incredible forces are transferred
backwards through the shift mechanism when the
bike misses a shift. Thanks to Travis Fowler in Las Vegas for the use of his bike - He's got the smoothest, quickest shifting 14 in the world!
|
||
| Unleash your bike's power and control | |||
 Factory Pro Race bike ECU Reflash
|
Phenomenal - Delimit your track or AFM bike. Remove high rpm power restrictions Change rev limiter. Remove / modify speed limiter Modify ignition timing and fuel tables We have all learned that each bike, even with the same aftermarket parts, requires different mapping than it's identical twin bike. That's why when someone "downloads the perfect map" off of some website for a pc or Bazzaz, that it only has a 10% chance of being perfect "on YOUR bike". With 35+ years of tuning experience, Factory Pro knows that the key to silky smooth and strong running is individualized, perfect tuning on each bike - That's why we do tuning for people all over. So:
marc@factorypro.com (415) 415 883-5620 or mail in 800 869-0497 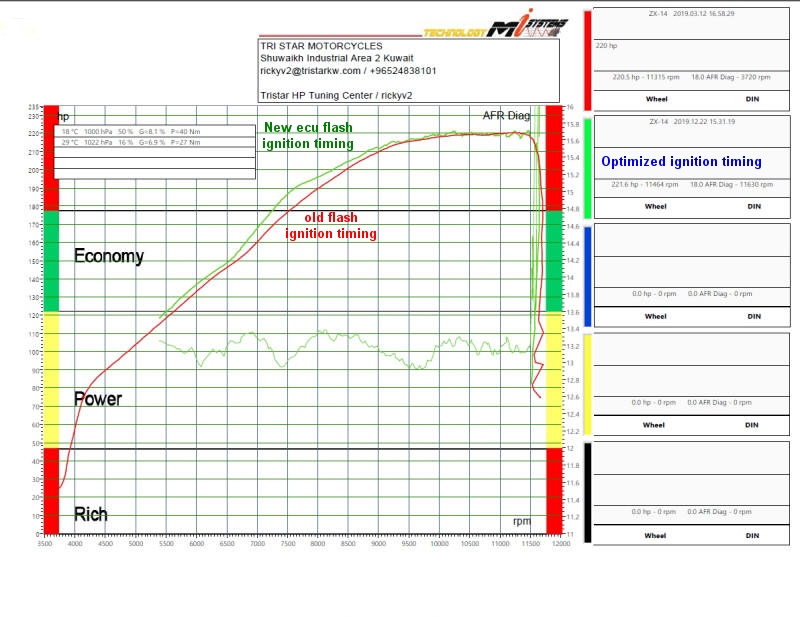 Here is a dyno chart showing improvements gained by good ECU tuning with good testing procedures. The red trace was the target, being the ecu flash that the bike originally had been flashed (and the red trace was probably better than stock) with and the green trace, is what the bike ended up with when the ignition timing was finally optimized. What does "optimized" mean? It means that, under that load condition, that, if you add or subtract much more than a degree of timing, you will lose power. Comes down to time, heat and geometry. Thanks, Marc |
||
|
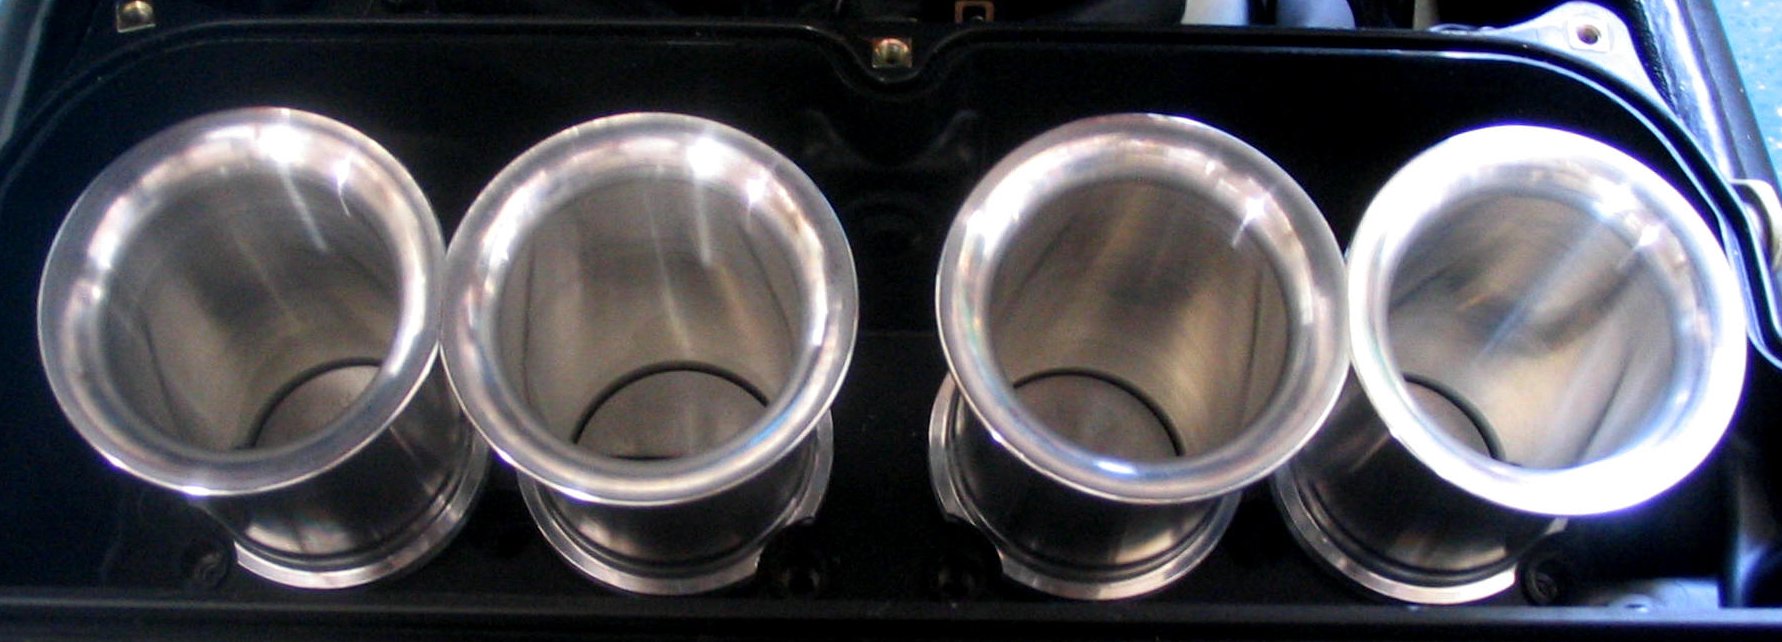
Factory Pro Billet Velocity Stacks
(patented) |
|||
|
VEL-K96-2525-v50 $429.95 Gen 1 and Gen 2 fits 06-07 and 08-24 We RECOMMEND this midrange setup Extra strong Midrange and about 1-2 topend hp. (replaces oem 14073-0097/0168) Midrange V Stack Test results
This ZX-14: GREEN RED +4 hp at 4000 |
Billet MIDRANGE Velocity Stacks Patented Quick change, clampless high velocity design. Super seal design keeps all the pressurized air IN the airbox. Note from Marc: The "Midrange" Race stacks are my choice for any street and most track use. The additional 4-5 HP across the 7000 to 9000 rpm range augments the 2 True HP gain at 10,000 rpm. For street and track use, the midrange is "where it's at" and for track use, well, ask Ryan Schnitz or Brock Davidson if they bang it off the rev limit every shift (no.... they run where the power is ;-) Feedback I have both on
my 14, the TRE went on really early in the build
and made a difference but I ended up pulling the
flies out so it wasnt really needed after that.
I got the top end stacks and yes they made a
improvement in power above 7200 rpm, picked up
around 5 hp from 7800 to redline. If only street
riding the midrange stacks are a better choice
though. 07bluezx14 |
||
|
Factory Pro Billet Velocity Stacks |
|||
 Special HI RPM / Topend Super seal Billet Stacks VEL-K96-1515-v50 $429.95 fits 06-07 Gen 1 and 08-20 Gen 2. (replaces oem 14073-0097/168) |
"HIGH RPM" Top end
I have both on my 14, the TRE went on really early in the build and made a difference but I ended up pulling the flies out so it wasn't really needed after that. I got the top end stacks and yes they made a improvement in power above 7200 rpm, picked up around 5 hp from 7800 to redline. If only street riding the midrange stacks are a better choice though. 07bluezx14 ....................... Install and drag race feedback: http://www.bikeland.org/board/viewthread.php?FID=27&TID=40772
.......................
The
stacks are well made and come in 15 mm (race) and 25 mm (street)
lengths. They seal to the airbox better than the stock stacks. The
straight part of these stacks that seals in the air box are rubber
with aluminum bell mouths. The match to the throttle bodies and the
aluminum bell mouths is perfect with no power robbing ridges. I
purchased the street length 25mm stacks after testing because that is
where I do most of my riding. If I was primarily a drag racer I
would install the shorter 15 mm stacks because most of the 15mm's benefit
is in the 9,000 to 11,000 RPM range with the shorter stack length.
After the first 100 feet you are in this range all the time anyway.
Thanks - John S. |
||
|
HI RPM / Topend style
RACE V Stack Test results
GREEN BLUE
+2 hp at 4000 |
HI RPM / Topend RACE style V Stack Test results
|
||
| Hybrid Ceramic Wheel Bearings | |||
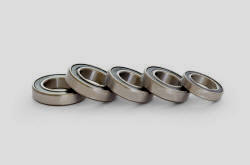 reg $340.20 5 bearing kit front and rear wheel + sprocket carrier pn: BE-HYCER-K96/zx14r,06-24 |
Hybrid Ceramic Wheel Bearings 5 bearing set 2 front wheel bearings 2 rear wheel bearings 1 sprocket carrier bearing Tough steel races and almost friction free Trisilicon tetranitride si3n4 ceramic balls. Bearings are pregreased and ready to use. Bearings have rubber seals that are easy to remove if desired. Decrease rolling resistance - Proof? It's even easier to roll in the garage Slightly improve mileage Slightly improve acceleration Slightly improve top speed marc@factorypro.com 415 883-5620 |
||
|
Evo Shift Kit Feedback I have one, I can't compare the "with or without" performance of it - I installed it shortly after buying my 14 (during the break-in period). It will give positive shifts up or down at virtually ANY rpm (with or without clutch). I rarely use my clutch except to shift from like 2nd to 1st, or into 1st from neutral, and going to second (if I'm not blasting on the gas that is). I would say-get it-certainly hasn't hurt my transmission. And she does shift quite well. If ya do get it - that bolt that holds the star in there is VERY TIGHT! You will need to get a long shanked something in the head of it-and smack it with a hammer(before trying to loosen the allen). Also, get er up on a rear stand, instead of the kickstand-when ya pull the shift arm out to the left side there, oil's gonna go everywhere if she's sittin on her sidestand. Other than that-pretty easy to install. DO NOT FORCE THE CLUTCH BASKET BACK IN -if it isn't lining up and STRAIGHT-you'll play hell tryin to pull it back out to line it up for a second shot. jollyroger 12/12/2009 |
|||
Shift STAR Installation pics
ZX14
(Thanks to Travis Fowler)
NOTE!!
These are ROUGH and GENERAL and abbreviated clues - and NOT to be used without a
genuine Kawasaki Service manual for proper assembly.
Tools, Partial list
5mm allen wrench
1/2" air or electric impact wrench
27mm and
30mm 1/2" drive socket
external circlip pliers (small / medium size)
Pliers, needle nose and regular
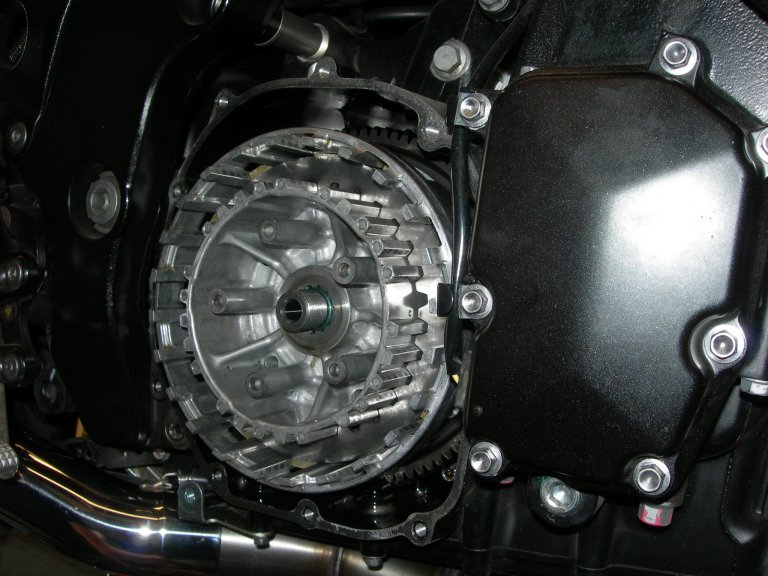
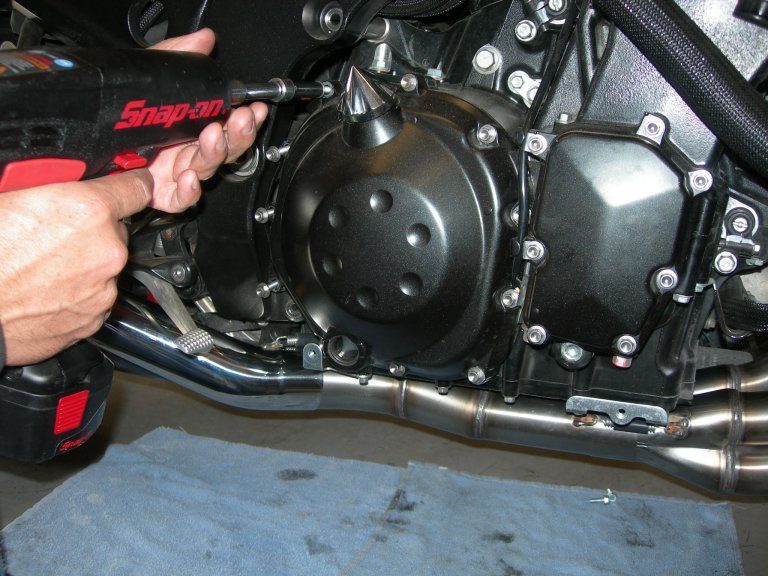 Remove clutch cover. Only a few drops of oil will come out. |
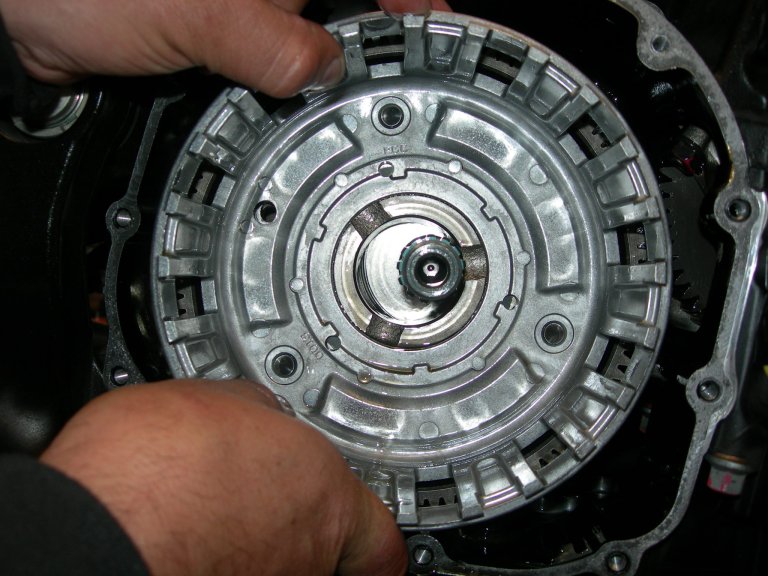
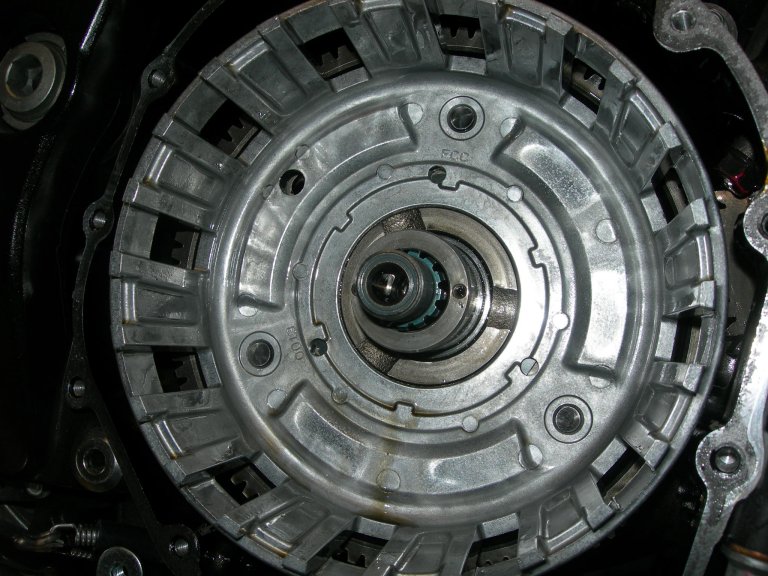
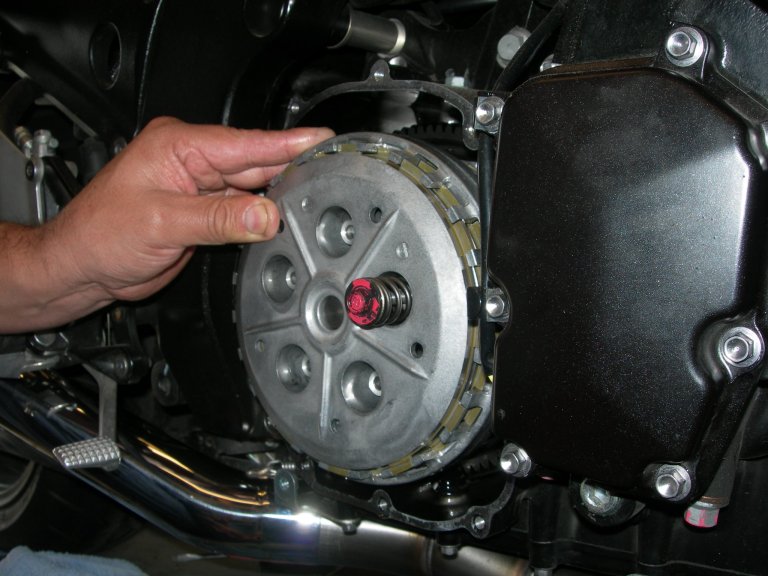
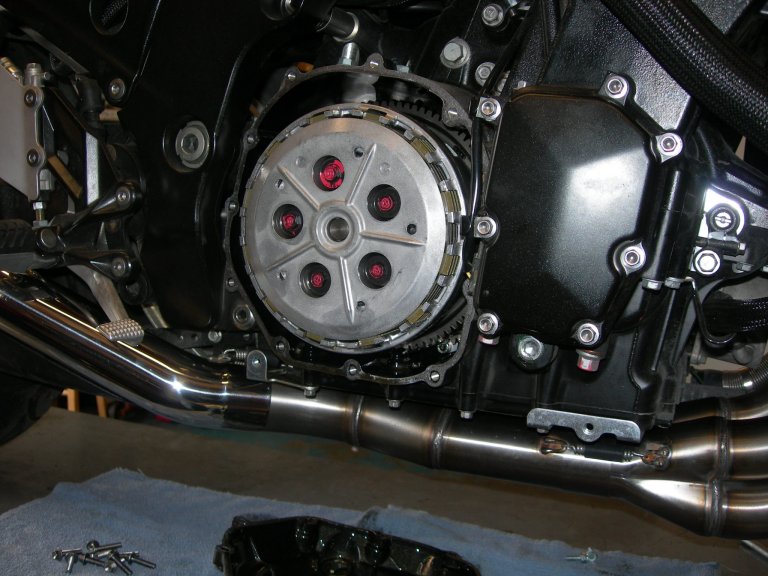 Now, you can see the outer clutch plate, with the 5 clutch spring mounting screws (pink, today) |
 Remove the clutch spring bolts. |
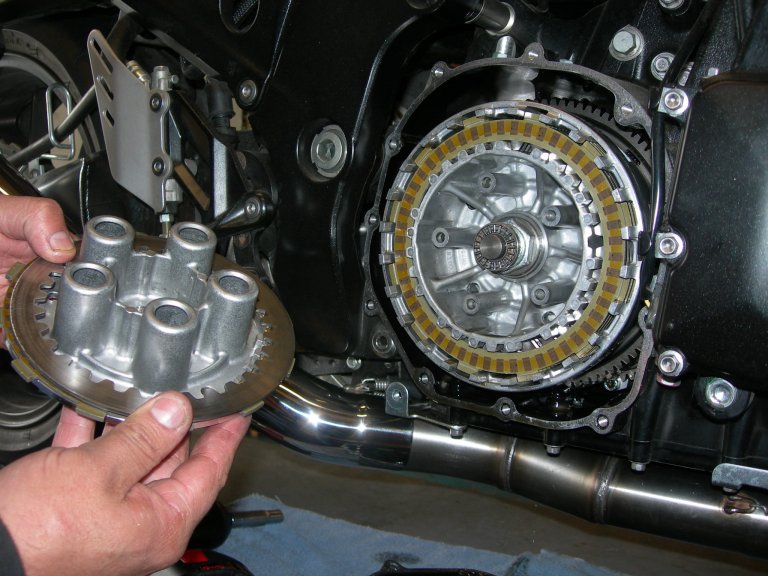 After removing the 5 clutch spring screws, gently pull away the outer plate. Some clutch plates will probably stick to the outer, but that's ok. |
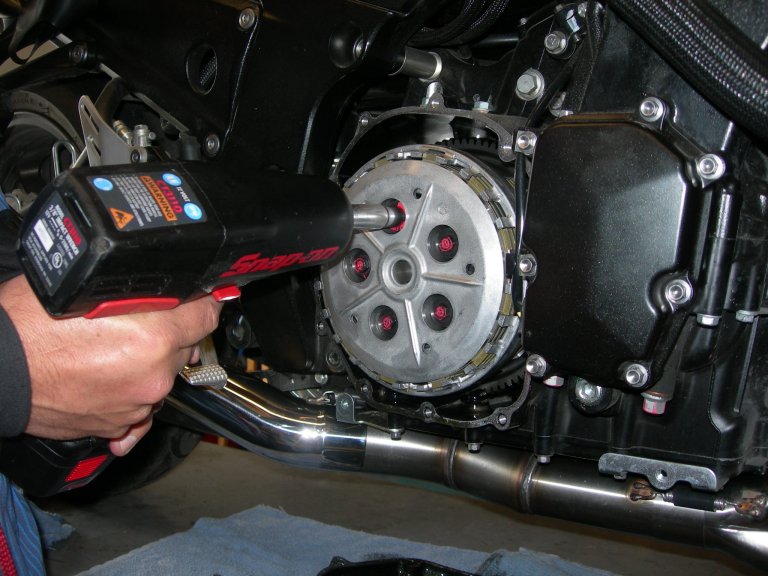
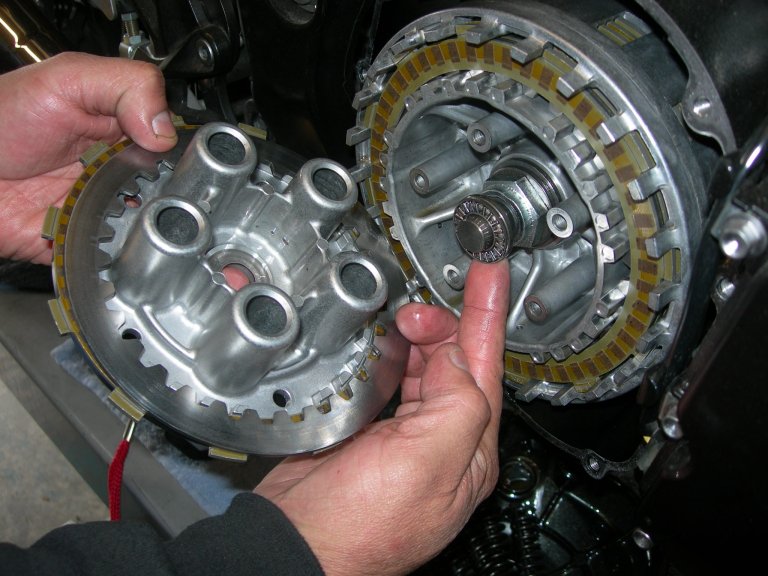 This is a radial "Torrington" bearing on the "mushroom" shaped "clutch throwout button. Note: There is a "thrust" washer still stuck on the inside of the outer clutch plate. Remove the 27mm or 30mm nut from the clutch shaft. Use a 1/2" air or electric impact wrench. Remove the "Bellview" washer and flat plate washer and the rest of the clutch plates (fiber and steel). |
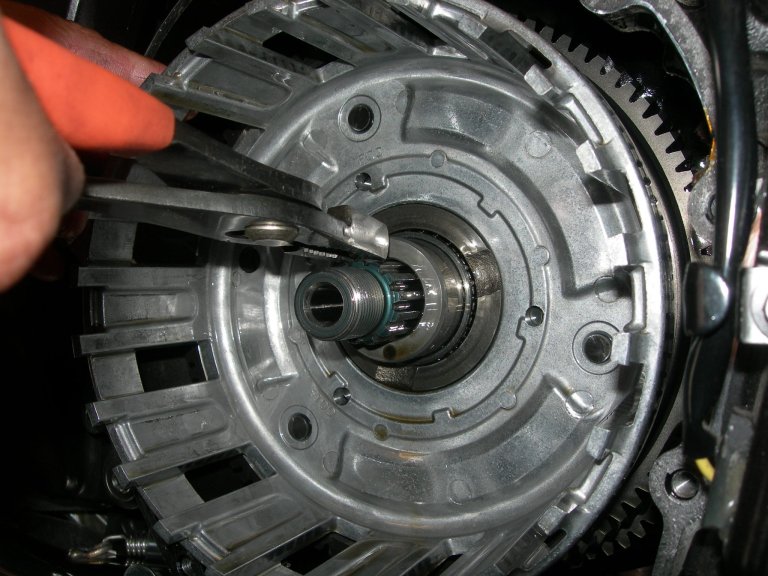
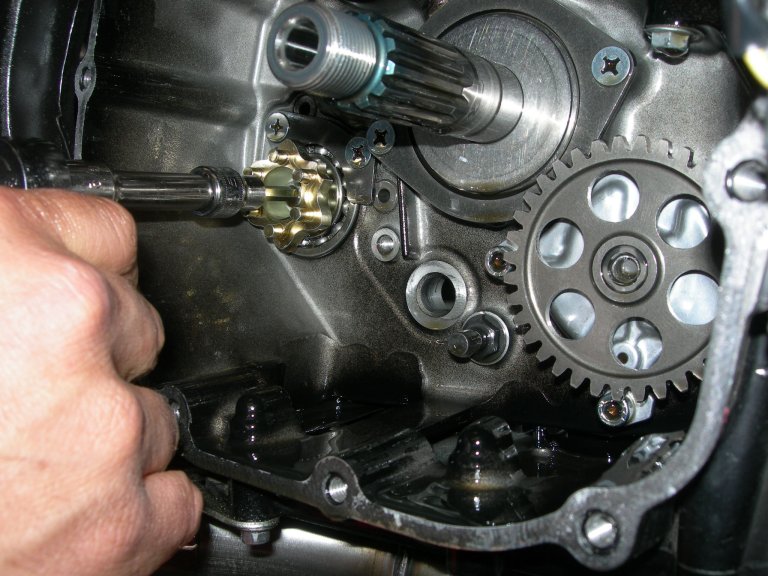
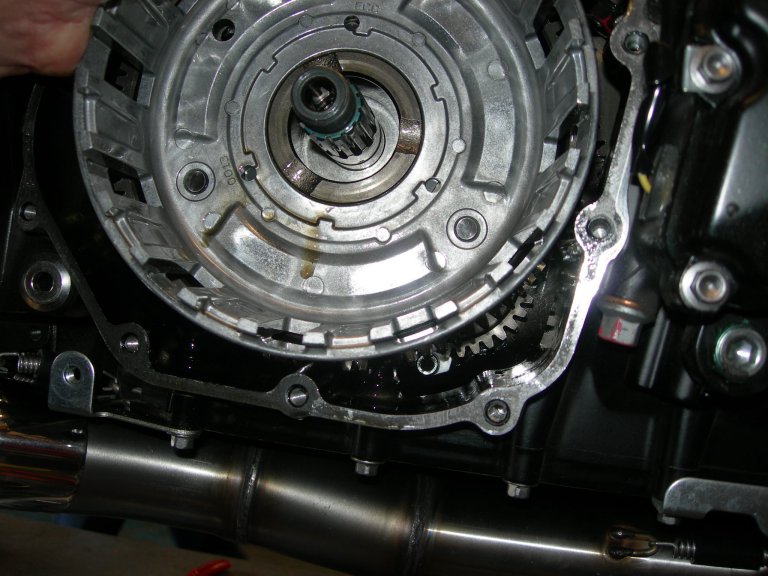
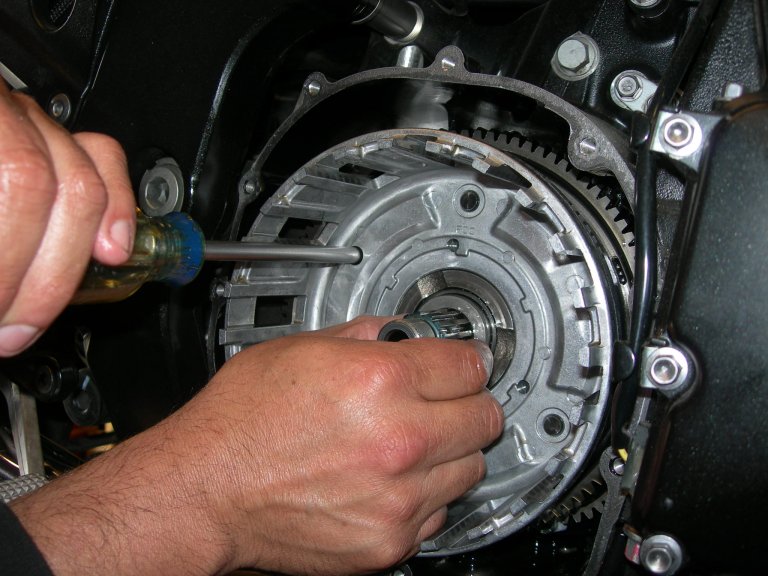
 Here's a view of the clutch basket. Hmmm...... just pull it out... Hey! It hits the cases and I can't!! |
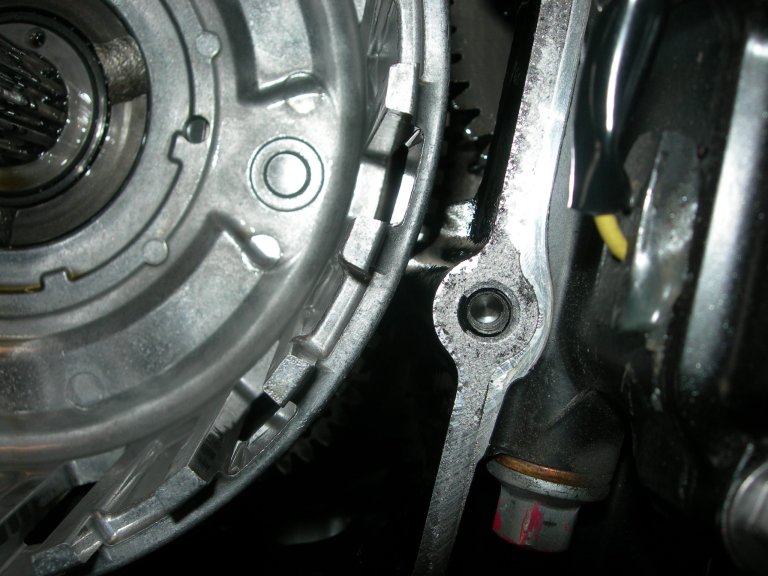 Here's where it hits - just below this screw hole. |
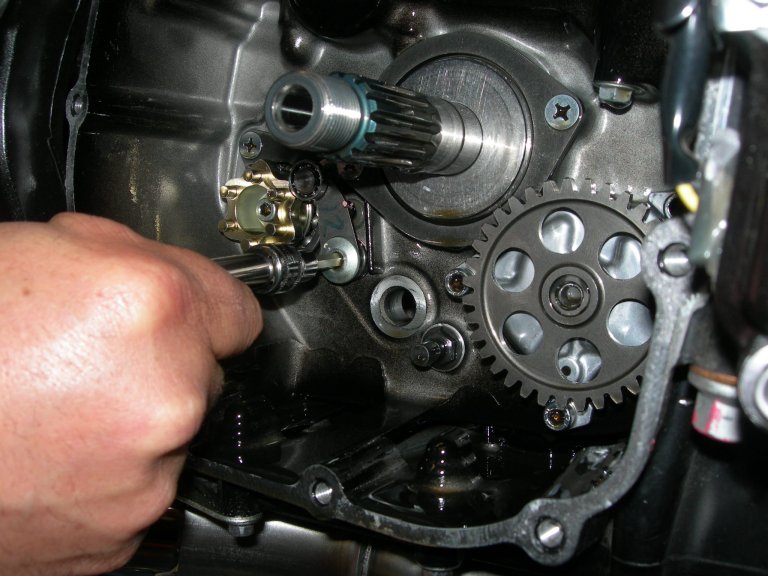
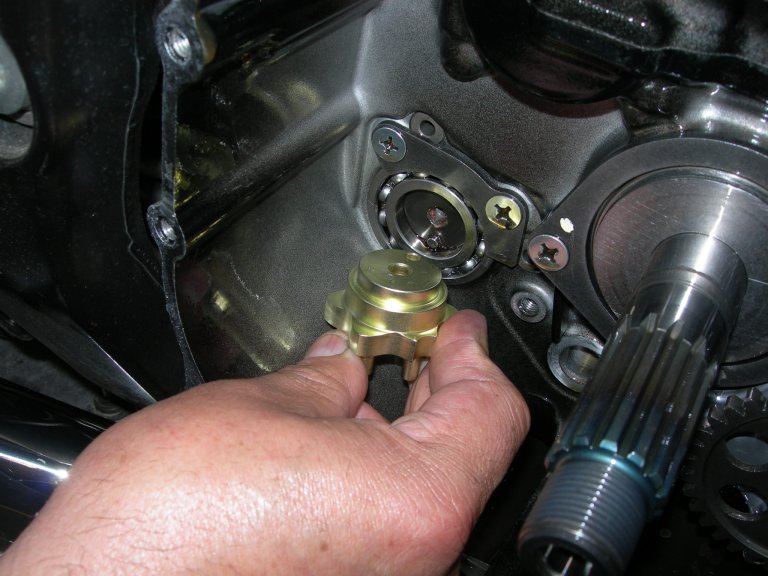
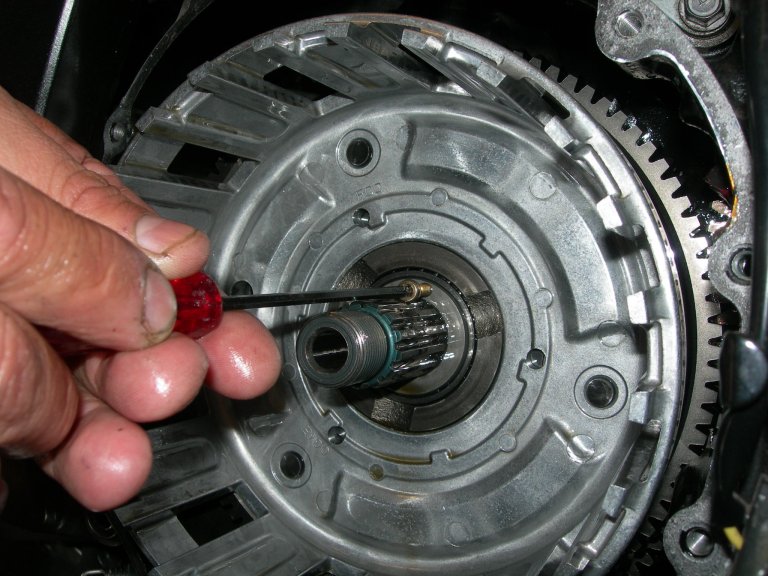 Trick: Insert a 4mm screw into this clutch collar - leave the head exposed. |
 Now, grab the head of the screw and pull the collar out - Then, gently remove the bearing, too. |
 Now you have enough space to move the clutch basket to the left and that makes enough room for the big primary gear to clear the engine case. |
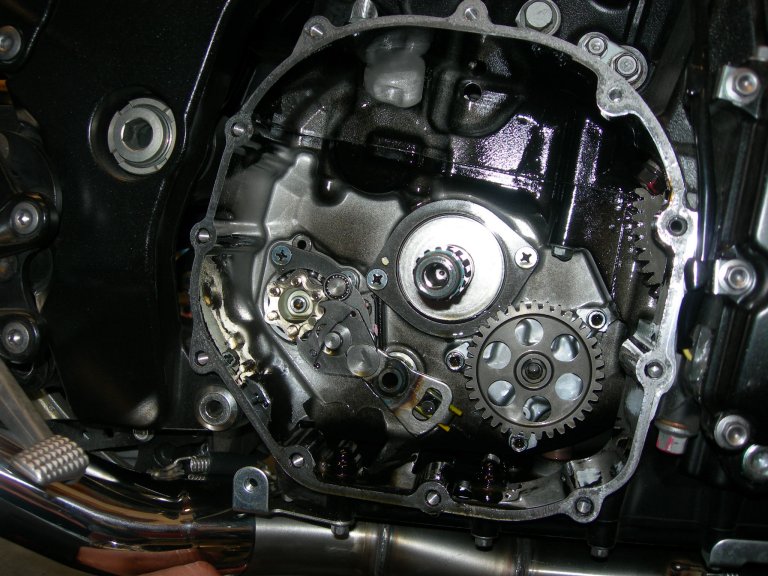 Success! Plenty of room to work with. LAY A SHOP RAG AT THE BOTTOM OF THE AREA to prevent screws,
arms, collars from falling into the crankcase. Now - go to the left side of the bike....... |
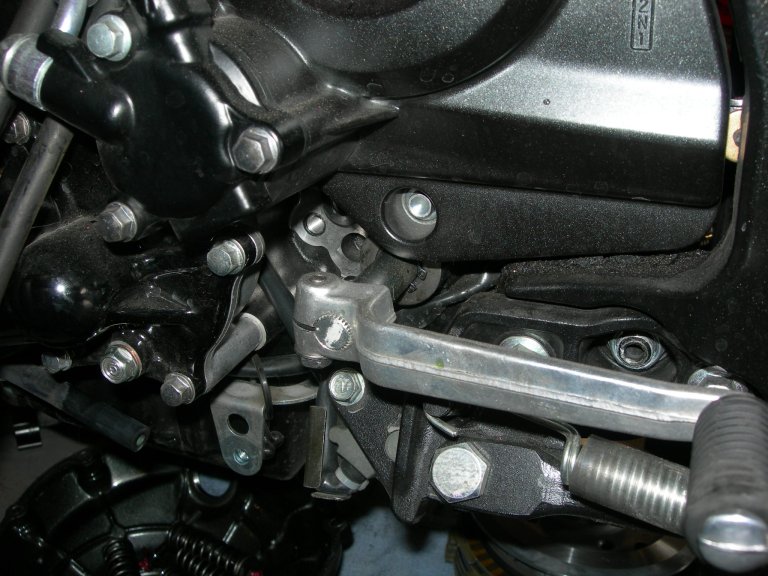
Now, remove the 10mm headed bolt from the shift lever Then - With circlip pliers, remove the shift shaft retaining circlip and plate washer and don't loose them. |
 Slide the shift shaft out. |
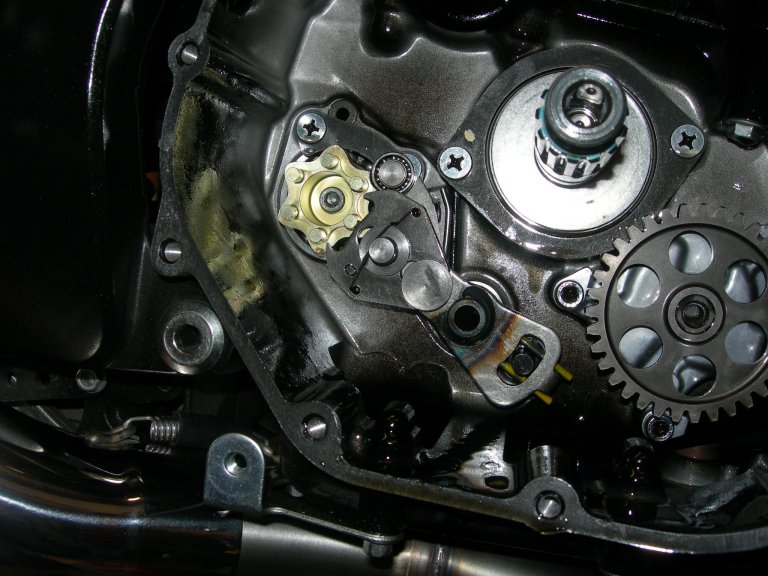
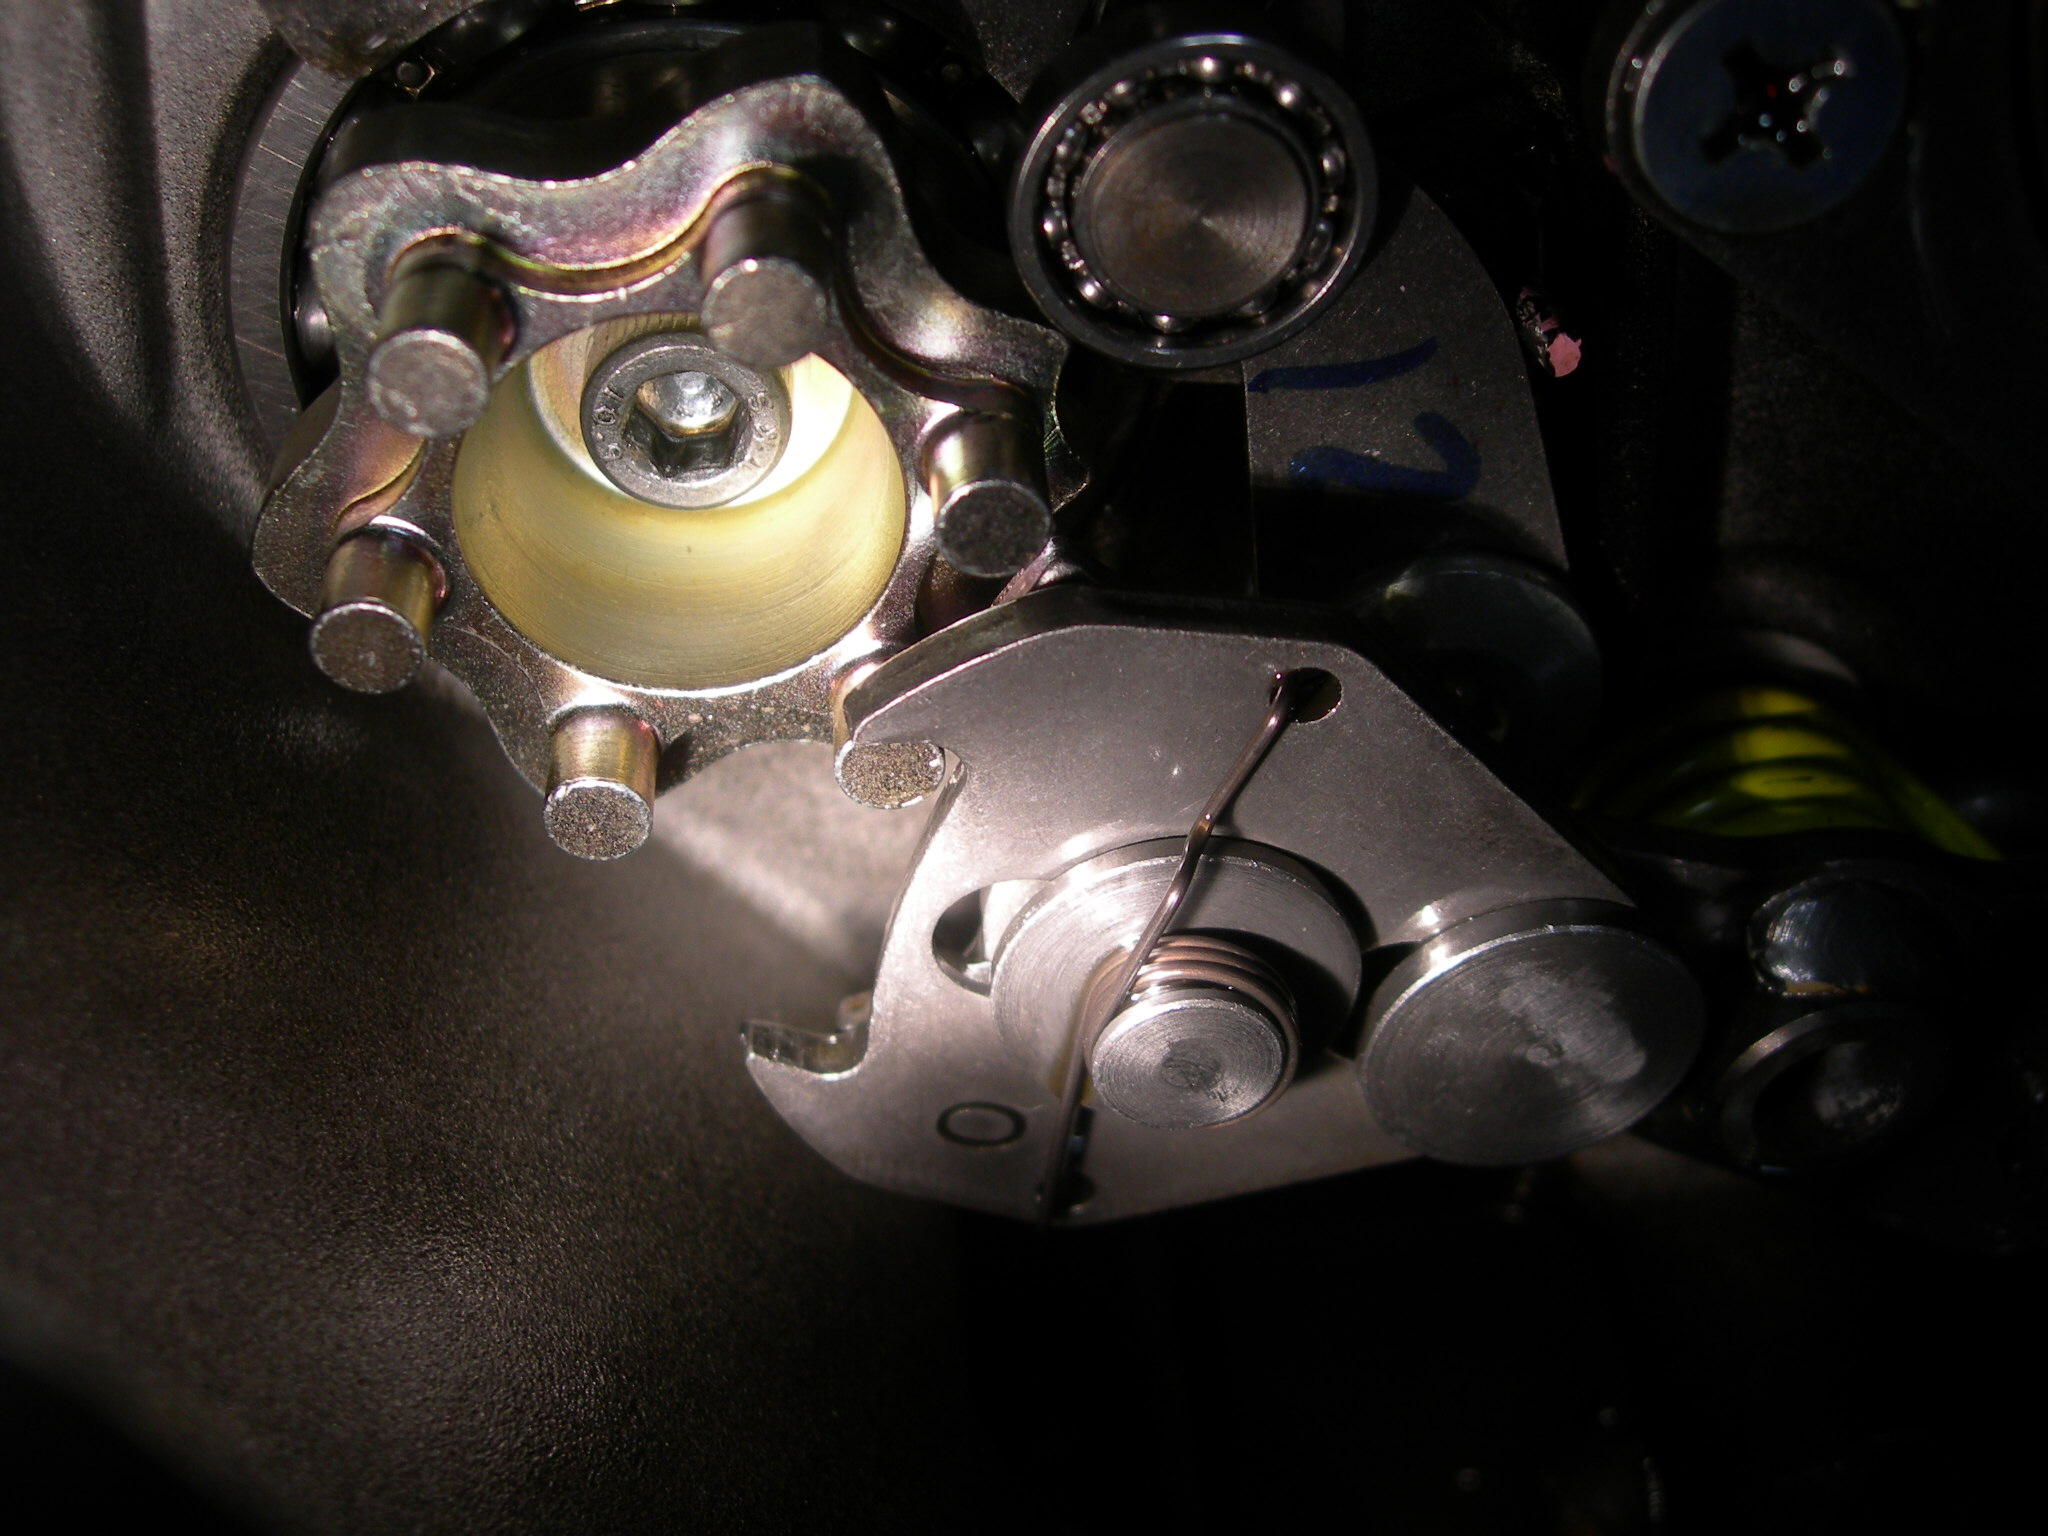
 Remove the detent arm pivot bolt. (this bike had a Shift STAR kit previously installed, so we will just pretend that we are removing the stock grey shift star and "non-bearinged" detent arm....) |
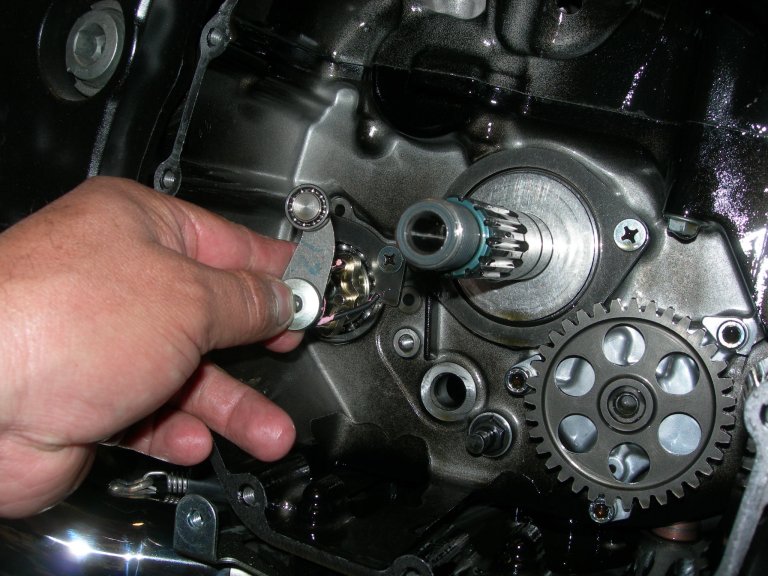 Here's the detent arm removed. The stock shift spring probably has pink paint on it. |
 Remove the stock grey star. Use a 5mm allen wrench. |
 Stock grey shift star removed. |
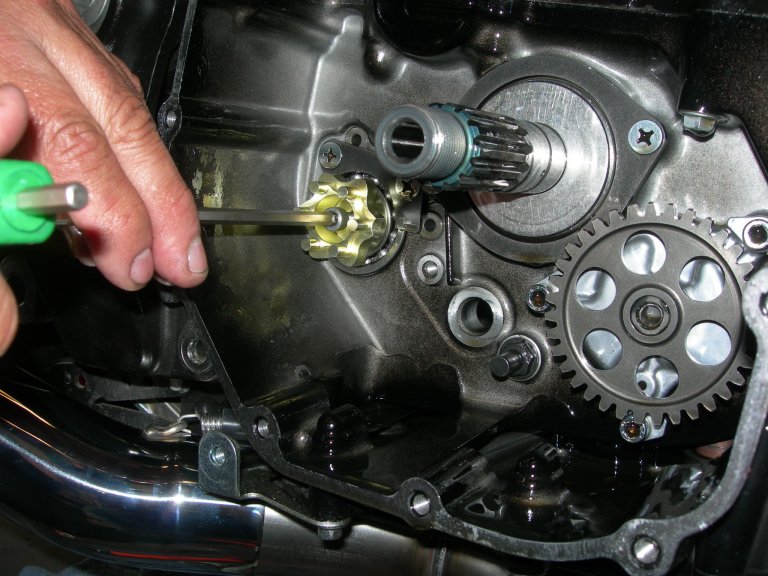 Install the new gold plated Factory Pro STAR. Use a bit of loctite on the screw. 6-8 ftlbs torque. |
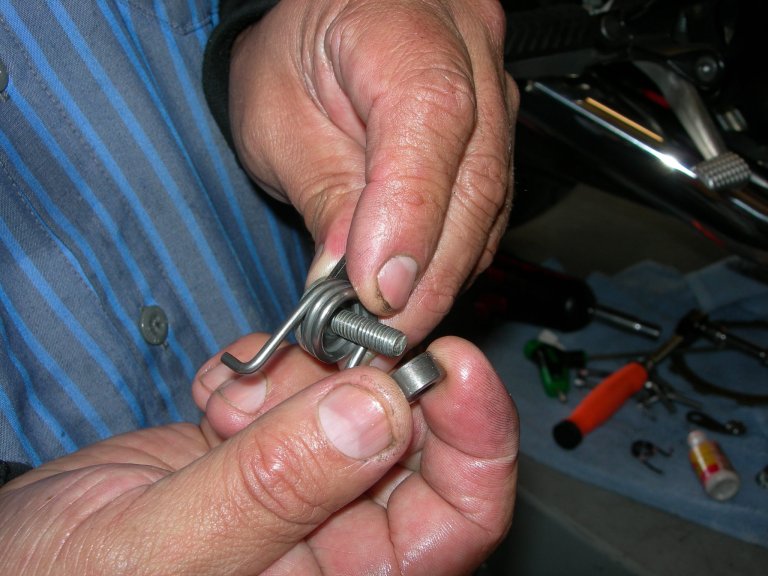 Hand assemble the new Factory Pro Detent Arm and the new Factory Pro performance spring. Make sure you re-use the stock spacer collar. |
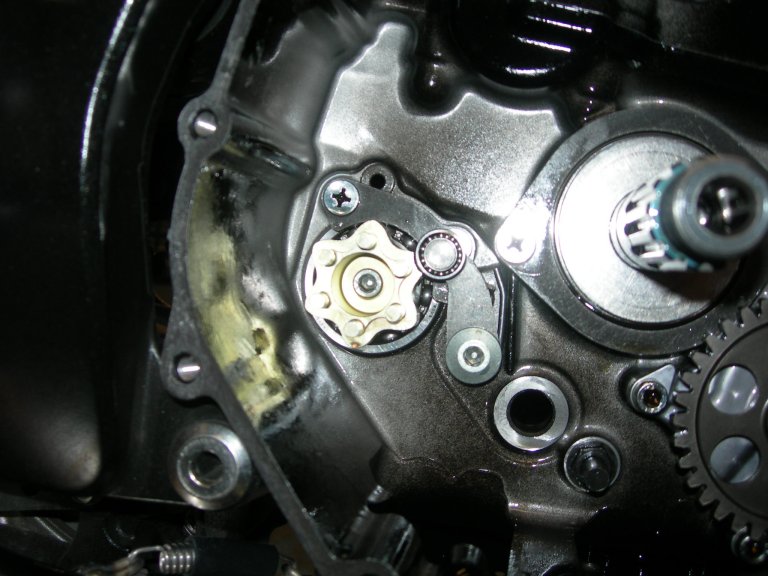 Ahh! All assembled and happy. It takes a few minutes to get the detent arm lined up and
tightened. Make sure you don't bind and bend the arm when
installing. Use a drop of loctite type threadlocker on the screw. |
 Slide in the shift shaft. |
|
Replace the shift shaft plate washer and circlip. Replace the shift lever and bolt. Check the shifting - between 1st and neutral and make sure that things look right and feel OK. It's a Kawasaki so you can't shift to 2nd unless the bike is rolling. |
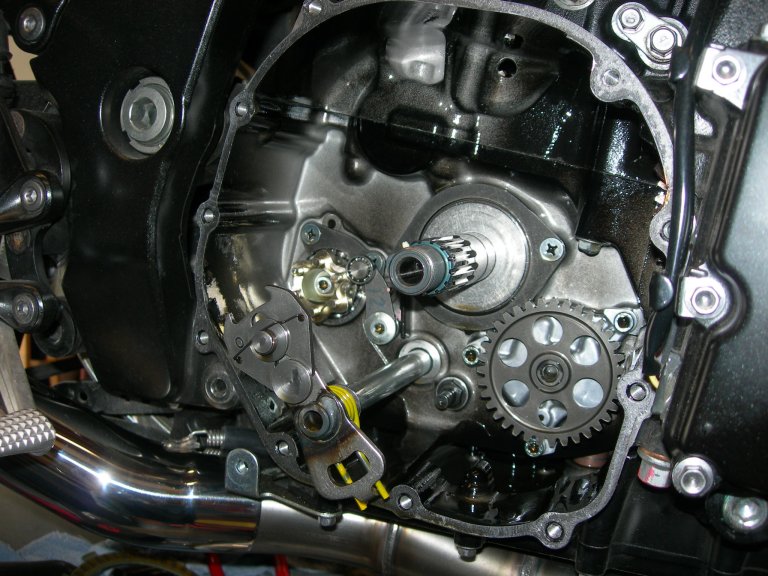
 Basket on - Make sure to rough align it with the oil pump gear (behind primary gear, lower right, 5 o'clock position) |
. Slide in the clutch shaft bearing and spacer collar (the one with the 4mm screw holes). Wiggle the basket a bit and it will get "1/2" aligned and in somewhat... Don't force it. |
 The 14 has a "split" primary gear and you have 1/2 of it aligned.
|
 Slide the inner clutch hub in. |
|
Install the: 1. Thick flat washer 2. Domed "Belleville" lock washer (domed inner surface to the outside, towards you) 3. 27mm or 30mm nut to hold it all together. 27mm or 30mm nut torque: 100 ft-lb or 135 nm (thanks Kyrre H?dahl, Norway for the torque specs) 4. Install "clutch pusher", Torrington bearing and thrust washer (still in the inner clutch hub?) 5. Replace clutch plates: 6. then a steel, then alternate fiber and steel till the last fiber and it's outer tangs are lined up to the "short, alternate outer groove". See below picture. |
 Install the outer clutch hub plate. Install the clutch springs and bolts. |
|
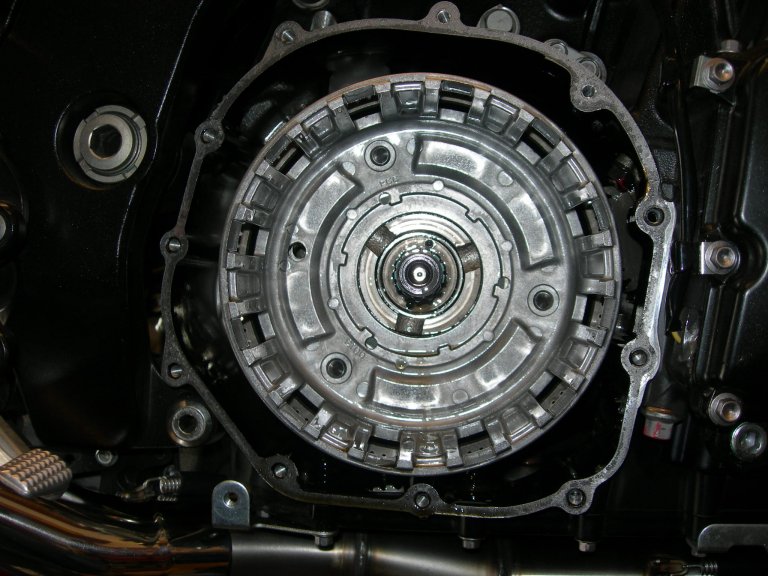
Done! (note: this is the original disassembly picture - Use hand tools to tighten up the cover screws - NOT an impact wrench!) |
Project bike: Travis Fowler / Las Vegas
R&D Race Head Gasket
Done
R&D Megacycle Drop-in Intake Cam (uses stock valve springs)
Done
Remove TB Secondaries
Done
R&D and manufacture Shift STAR Kit
(done, see above to purchase)
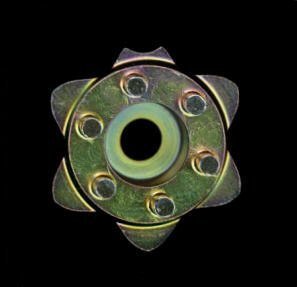
 Factory Pro Shift STAR |
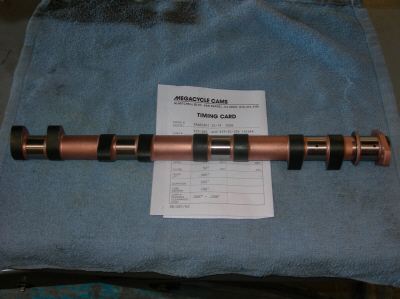 Megacycle prototype Drop-in intake cam |
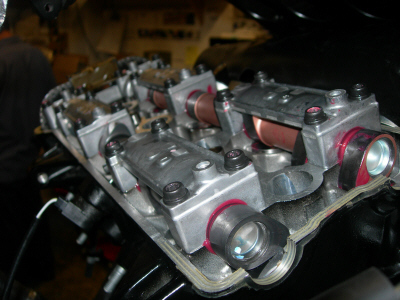 Megacycle prototype Drop-in intake cam - the red is Redline Assembly lube |
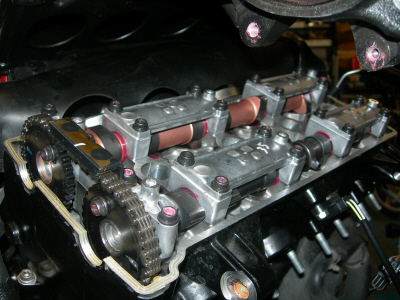 Megacycle prototype Drop-in intake cam |
| Absolutely NO carb parts sold in California. | ||
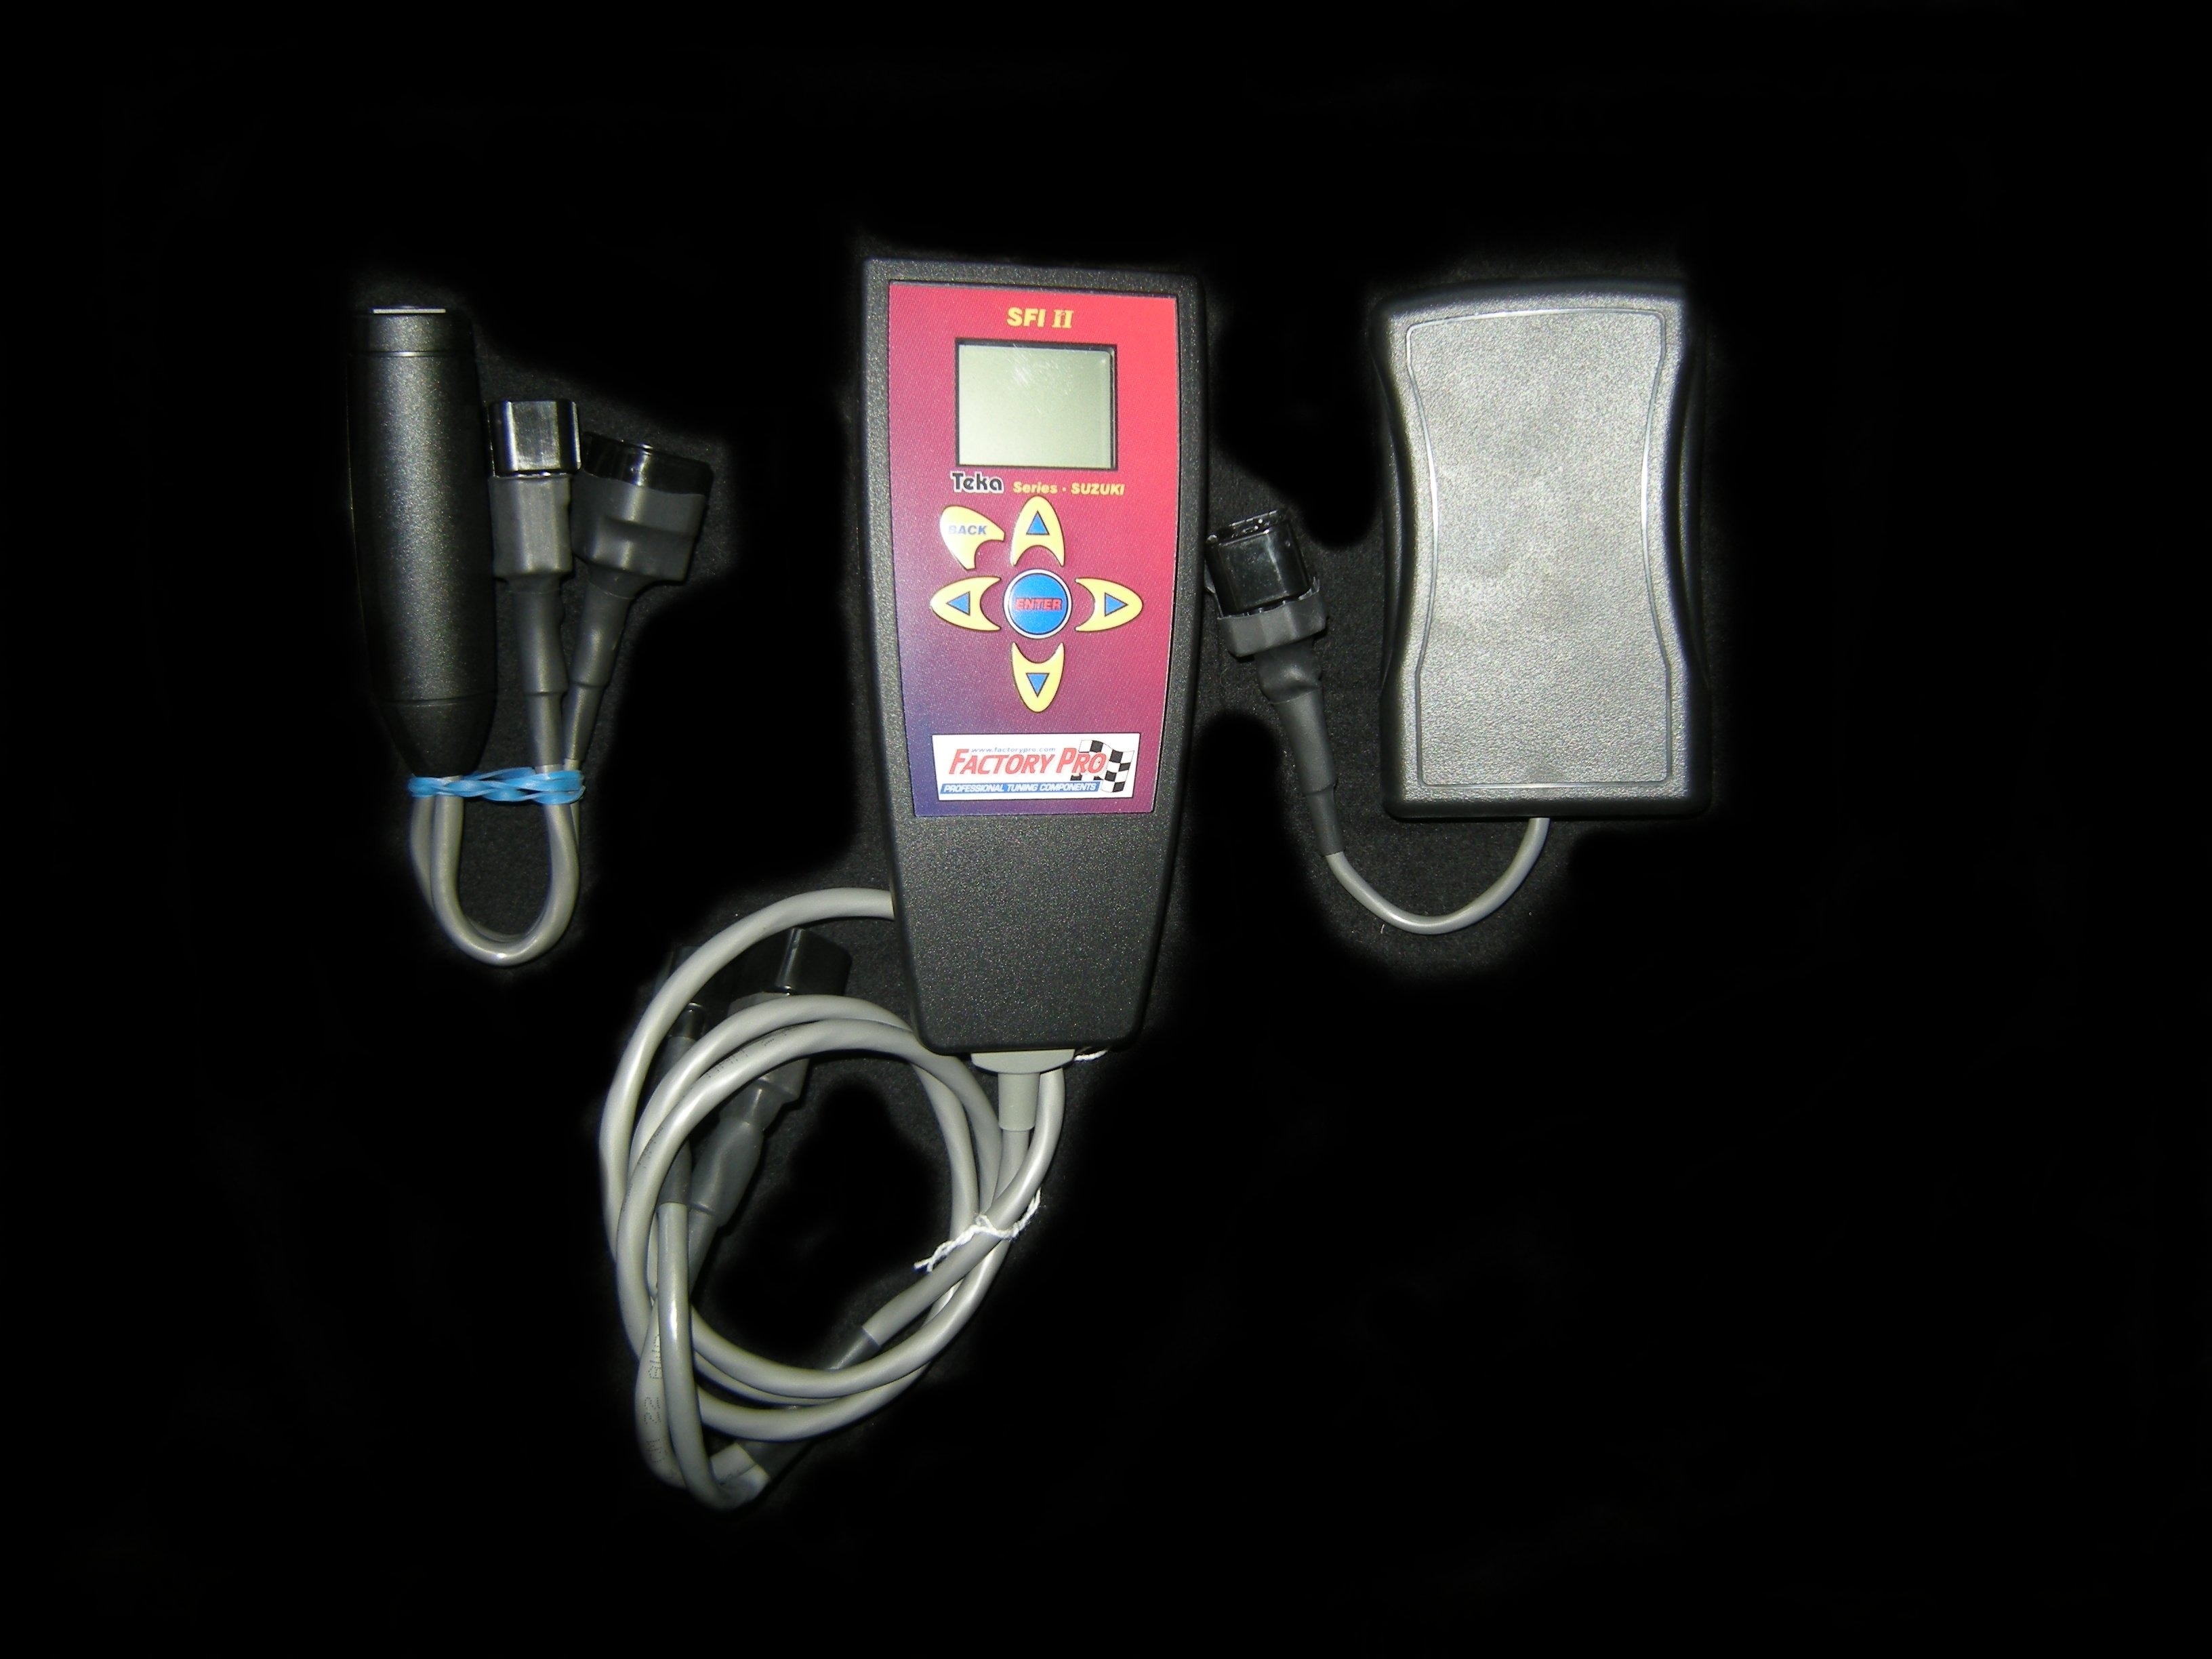 |
New and improved Finally - Quick, easy, cost effective
Suzuki tuning
with no expensive "add-on boxes" |
|
|
Contact Factory
Pro 415 883-5620 no fax
Factory Pro If
it's |
parts
information EC997
dynamometer information Product
Support /Tech SECTION
And most importantly This Tuning Site has been visited by people. www.digits.net - the oldest counting service on the web |
Clock widget
|
LINKS |
|
|
|
Flight Training - train with AMA race winner Todd Harrington. The Harringtons own American Flyers, one of the most established flight training facilities in the USA - 8 locations - 800-362-0808 |
|
Train to Win |
The Rich Oliver
Mystery School will help you discover your hidden inner strength.
It will challenge you. It will teach you a new way of thinking and a new way of riding. You can take your riding to an exciting new level! We use a variety of proven drills and training techniques. Practicing these techniques with our Yamaha dirt track trainers will enhance your abilities both on the track or the street. It doesn't matter what you ride or race, the Rich Oliver Mystery School improves everyone's skill level and mindset! |
|
|
Book a sightseeing flight over the Wine Country
or a Kamikaze aerobatic flight or a biplane flight over famous
Sonoma Raceway,
the Golden Gate Bridge and the San Francisco Bay for one or two during
the spring and get a free souvenir t shirt! 707 938 2444 |
|
Make your next tour Unforgettable, Affordable and Exotic. Superbike Tours Thailand - See you there. Geoff@superbiketoursthailand.com |
|
| The extension of the laboratory
for engines of the Swiss Federal Institute of Technology was completed
in about 1935. Its architect was Rudolf Otto Salvisberg (1882-1940).
He had a successful career in Berlin but returned to Switzerland after
the advent of the Nazis. His architectural style was somewhat similar
to that of Erich Mendelsohn. The staircase of the laboratory is in normal
use but well preserved. Edited to the tunes of Chemical Residue by Herbie Hancock. |
|
 |
|
|
Artisan Crafted Fine Cheeses – Since 1865 - Specializing in Handmade Brie & Camembert |
|
| Marin French Cheese Co., also known as The Cheese Factory and Rouge et Noir is not just the oldest cheese manufacturer in the country, but a vacationers and day trippers destination as well as a unique part of American History. Located north of San Francisco, east of Napa County, west of Pt. Reyes and Olema and south of Sonoma County, Marin French has produced hand crafted Artisan soft ripened cheese since 1865. Rouge et Noir cheeses are similar to French and European varieties but reflect the characteristics of Northern California, producing it's own regional style. | |