|
GSX1300r Hayabusa, 99-07 |
|
| We'll start with the assumption that you already
can competently remove the fuel tank and airbox. If you aren't confident
that you can do that, stop right now and get an experienced friend or
pay a good shop........... After you have the airbox removed, (ok, one hint is that the throttle body clamps clamp the airbox rubbers to the throttle bodies). - look at the stock rubbers from the bottom side - they are "offset" in the hole. Remove the stock rubber velocity stacks. They are
semi glued in with what looks like a light latex glue, so you'll have
to kinda push the outer edge inwards till they collapse in on themselves
- then push them on out. |
|
.JPG) |
Look at the Factory Pro adapter rubbers. You'll see
that our rubber adapter rubbers are "offset" to one side, just like
the stock ones. Flip the airbox upside down. Usually, there will be a dab of paint
on the new adapter rubbers that you'll line up to the 2 index marks
cast into the bottom of the airbox. To glue or not to glue the new adapters? I don't glue them. They seal relatively perfectly at the airbox and then they clamp onto the throttle bodies. What more could you want? They can't rotate in the hole if they are clamped to the throttle bodies..... |
.JPG) |
Feed the new rubber adapter into the airbox. Note! The patented stack's"Throttle Body Stuffer" tongue goes into the stock throttle bodies, retaining more laminar air flow and conserving refracting wave potential. So.... make sure the stuffer tongue is on the outside of the airbox. If the paint dab wanders away from the index marks on the airbox, no worries (as they say down there) - Once you get the inside and outside lips "happy" above and below the airbox hole, we left just a slight amount of "wiggle room" and you can just rotate the rubbers back into alignment. |
.JPG) |
This is what it should look like. Skinny side next to the airbox index marks and thick side of the adapter rubbers - away from the airbox marks - towards the front of the airbox / bike. Stuffer tongue ready to insert into the throttle bodies. |
.JPG) |
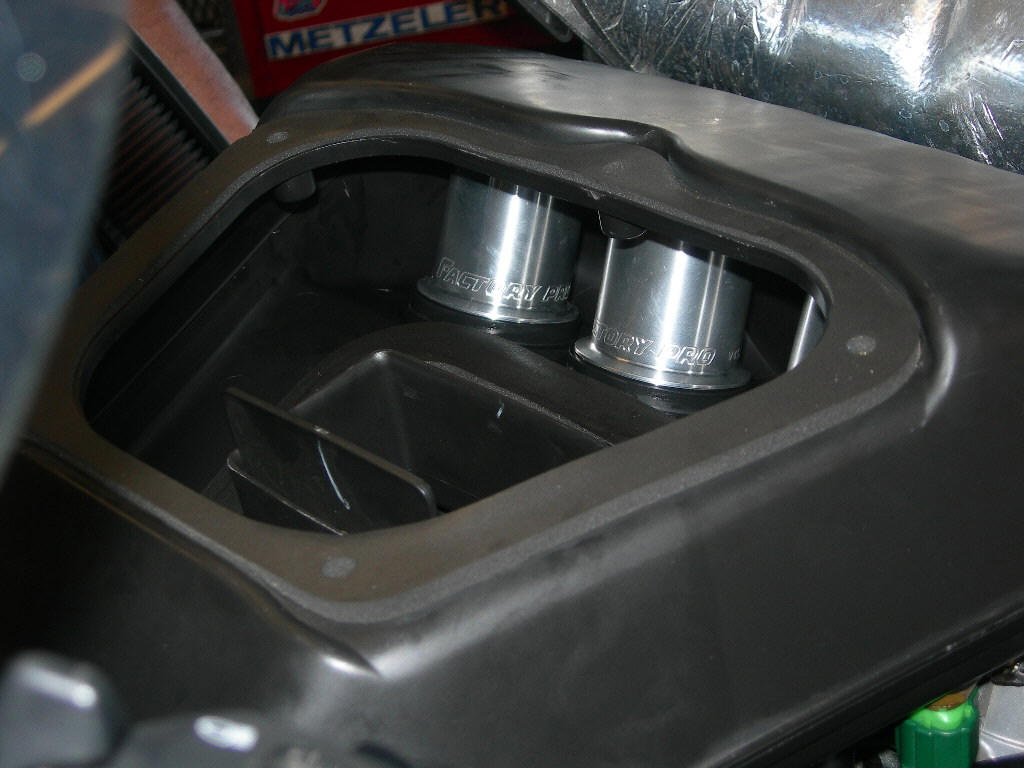
This is the inside of the airbox view. You can see the retaining female groove on the Factory Pro stack and if you were playing with the adapter rubbers and the stacks before you put them in, you'll have seen how the patented clampless retaining system works. Finally, a real use for "Liplock". Choices..... You can either install the airbox onto the bike now
and put the aluminum stacks on later - that makes putting the stacks
into the rubbers easier by keeping the rubber from rotating in the airbox
hole - OR - you can install the stacks into the rubbers and reorient
the rubbers again before you reinstall the airbox. |
 |
The early bikes have a 2 piece airbox and the later
ones have a glued together airbox. The one piece airbox is a bit more
difficult to install the alloy stacks, especially if you've got large
hands - but, still relatively easy to do. Especially considering the
hp gain........
|
.JPG) |
Anyhow..... inserting the stacks into the rubbers..... If you are feeling the need for some lubrication, use a temporary water based lube, not oil based. Almost in........ |
.JPG) |
Wiggle, wobble, twist, and or manipulate the alloy
stacks till they look like this. In. Once again, if the rubbers rotated in the airbox hole, just rotate them back to reindex them. |
 |
This is what your 2 piece Hayabusa airbox looks like
with a BMC RACE filter and
patented Factory Pro Billet Velocity
Stacks installed. The one piece airbox looks the same except you can't see the inside. |
| So - the hard part, installing
the stacks, is done. Now - if the airbox isn't already installed, just reassemble the airbox, put the stock throttle body clamps back onto the new adapter rubbers and put it back on the bike - along with the other parts that you took off. Yes - we always suggest that you use a Genuine Suzuki Service Manual. It's the LAST WORD. |
|
With new Superflare stacks - Is fuel injection retuning needed? We did the gsx1300r Superflaretm
R&D with a properly tuned stock Hayabusa with a pipe on it. We did no
additional fuel injection mapping during stack R&D - beyond originally
tuning the "stock stacked" bike to
Best Power settings in the first
place. Could you get better performance if custom mapping
for the stacks? |
|